| SEWING | CUTTING | FEEDING |
| Needles | General information | Feed dogs |
| Loopers | Knife adjustment | Presser foot |
| Threaading diagrams | Sharpening the cutters | Framecap assembly/Cams |
PRESSER FOOT AND PRESSER FOOT FINGER
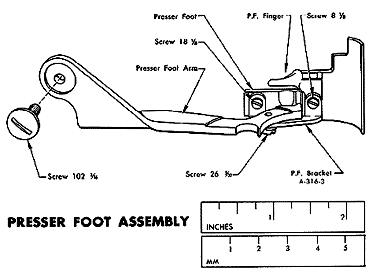
7) The Presser Foot on the Style 70-D3B may be
tilted to accommodate certain fabrics. To make this adjustment,
loosen Screw 26-5/32, tilt foot to desired angle and tighten Screw
26-5/32. After lifting this Presser Foot Latch, the Presser Foot
Arm with its Presser Foot may swing to one side providing accessibility
to the Needle and Loopers.
8) The Presser Foot Finger should be positioned upon the Presser Foot so that its left edge just covers the right edge of the slot in the Needle Plate. If the point of the Needle is slightly deflected to the right, it should not hit the Presser Foot Finger.
9) Ordinarily, use as little pressure on the Presser Foot as is practical, the degree of pressure being adjustable by the Screw 6-3/8. This Screw is held in adjustment by Set Screw 13-5/32 at the right side of the Head.
10) The Presser Arm on 70-D3B and 70-Y3B Machines is mounted to the Presser Arm Pivot by Screw 102-3/16. Screw 102-3/16 is tightened until the Presser Arm swings freely without up and down play. Screw 1-#5 is now tightened to lock Screw 102-3/16.

|
|